One thing I found is that I was connecting to the maximum default number of peers and still not maxing out my connection. Consider this: If you can download at 6000KB/s, but your software is set to connect to a maximum number of 100 peers, what happens if the fastest they can upload is 30KB/s each? That's right, you connect to 100x30KB/s peers, and you only achieve 3000KB/s download (half your maximum throughput). It's even more of a problem on connections such as 100Mb/s where the downstream is approximately 12MB/s.
One real life scenario was when I was downloading an episode of Nichijou. I had already set my max connected peers to 150 from previous. I left it to download in the background while I chatted in IRC for a little bit and then thought to myself, "Why hasn't it finished yet?". It hadn't finished because I had connected to something like 135 seeds and 15 peers and was only managing to pull 800KB/s (new torrent). I upped the limit to 200 just to see if it would help and although it didn't connect to 200 (maybe 180 in total), I got 3.8MB/s. It's definitely worth adjusting your maximum connected peers if you have a good connection but rarely get your maximum seeds on well seeded torrents.
Then I ran into another problem. When you start downloading a torrent, the default action is to write that file to disk and fill it with zeros. Kind of a placeholder for the file if you like. For MP3 albums and small downloads, it's not a big deal because your HDD will have written the file before you've had time to connect to all your peers and reach a high download speed. The problem arose when I was downloading an OpenSUSE DVD ISO. uTorrent wanted to write 4.3GB as soon as I had started the download. It took a little while to write this, during which time I had connected to all my peers and hit 6MB/s download. Because the HDD was busy, I got a disk overloaded 100% warning in uTorrent and my download speed dropped drastically (a few hundred KB/s) since the HDD couldn't keep up with writing the file at maximum speed, plus the stress of an extra 6MB/s.
Writing the file and zeroing it out when the download starts is annoying. Not only will it cause your download speed to drop, but it also has the potential to cripple your system for a good few minutes. What happens if you download a 50GB Bluray ISO? It would take a good 15 minutes at least to write that at full speed, during which time I doubt you could load much else. Fortunately I found two methods within the uTorrent settings that help alleviate the problem.
Another annoyance that can hinder you from reaching your full speed is traffic management. An automated system that checks the packet headers to see what type of data it is. If it detects torrent traffic, it throttles the speed. You can work around this by using encryption in uTorrent.
So now let's move on to the actual tuning. I use uTorrent 1.6, but these options are pretty much universal. Click Options > Preferences to get started.
Downloads
Click the downloads tab, and ensure "Pre-allocate all files" is unchecked.
Connection
Bandwith Limiting
Did you know that uploading at your maximum speed can cripple your download speed? The latest versions of uTorrent set your maximum upload speed to 80% of what you can actually achieve to prevent that happening. If you don't know what your upload speed is, go to Speedtest, pick a local server and make a note. Multiply your rating in Mb/s by 128 to get your upload rate in KB/s. Then multiply that by 0.8.
Eg. 4.7Mb/s * 128 = 602KB/s * 0.8 = 481KB/s
Your result is what you should set your Global maximum upload rate to. Check the box for Alternate upload rate when not downloading and set the KB/s to 0 (unlimited). With these settings your downloads will not be crippled, and when they are done uTorrent will seed at maximum speed.

BitTorrent
Number of Connections
This will control how many peers you can connect to. Take a look at the image below
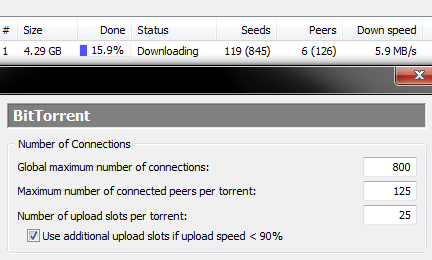
Be aware that setting this number too high could have adverse effects, so it's a case of trial and error.
Protocol Encryption
Setting encryption to Enabled and Allow incoming legacy connections will encrypt some of your traffic. This is particularly useful if you suspect your ISP is throttling your torrent traffic as it scambles the data and makes it unreadable by bandwith management systems. Again this is another setting that you should experiement with. You could set encryption to Forced and uncheck Allow incoming legacy connections for full encryption, but it will also limit the amount of peers you can connect to. It's probably better to have a little encryrption and a little throttling than full encryption and less connected peers.
Advanced
net.max_halfopen
This option specifies how many connections uTorrent should try to establish at any one time. The default is 8 which is very low. I have mine set to 100. The theory behind this is that it will take less time for you to connect to all your peers and reach your highest speed. Before tweaking this, I found that for files in the region of 200MB, that it would have completed before I had connected to all the peers and reached my full speed.
Users of XP SP2 or later should patch their tcpip.sys file to make the most of this increase, as the max number of halfopen connections was reduced. More information can be found here. This limitation was again removed in Windows Vista and Windows 7.
gui.update_rate
This won't affect your download speed but simply changes how often the data reported by the GUI is updated. The default is 1000ms (1 second) and the lowest you can select is 500ms. Any lower figures will be igored and 500ms will be used. I prefer having it update at half second intervals, but if you find CPU usage is high, you can set it to update less frequently if you wish.
bt.connect_speed
This option specifies the number of connections uTorrent should make each second up to the limit set in net.max_halfopen. The default is 20, and I set mine to 40.
diskio.sparse_files
This is an important option as it controls how the data is allocated on your hard drive. If False is selected (which is the default), then uTorrent will write a dummy file to the hard drive as soon as you add the torrent, but fill it with zeroes (the place holder file as explained earlier). This is fine for small files that can be written in a few seconds, but for large files like Bluray rips it can cause your drive to be busy for a long time, and the download speed will likely drop during this process as the HDD can't keep up with the incoming data. It may also cause programs to become unresponsive.
Setting this option to True (as I have done) will inform the filesystem of the size of the file, but will not physically zero out the data. Instead the only write operation uTorrent performs are writes for data actually downloaded. This not only saves your computer becoming unresponsive when adding large torrents, but also means that the hashing process for incomplete files is much faster as it only hashes what has been downloaded, rather than a full size pre-allocated file.
In my opinion True should be set by default, however there are some limitations regarding the support of this mode. It apparently only works on partitions formatted as NTFS (as opposed to FAT32 I suppose), however I can't speak of other filesystems such as EXT3. Also if you are using a non-administrator account with a disk quota, sparse files won't work and it will still be allocated.
I encourage you to at least try this option if you've noticed high amounts of disk activity or unresponsiveness when adding large torrents. This completely cured it for me.
Advanced - Disk Cache
Providing you set diskio.sparse_files to true, you don't really need to edit any settings here, but in case you couldn't (due to filesystem limitations for example), then these settings will help ease the pain of the file allocation stage.

You can check read and write patterns yourself in uTorrent. Simply click on the Speed tab in the lower half of the window (the tab that gives you a upload and download speed graph) and change it to show disk statistics. You can now see a bunch of cool stuff like how the cache is being used, how regular uTorrent is reading and writing to the HDD, and the throughput.
One setting I suggest you do experiment with is the cache size. While the settings above should be good for everybody, the amount of RAM you have to spare for a disk cache will vary from user to user, and the amount of RAM you will need to allocate to make a decent buffer length depends directly on your download speed, ie a 1MB connection will require a lot less RAM buffer than a 6MB connection if the HDD is busy/unwritable for 2 minutes.
If you have a fast connection and download large files, I strongly suggest setting Override automatic cache size and specifiy the size manually to whatever figure you are happy to use. This acts like a buffer in case the disk is busy and data cannot be written (a good example being the file allocation at the start of a large torrent, or if you do video editing etc). The downloaded data is stored in RAM, instead of the download speed being dropped to a rate the HDD can handle. Once the HDD becomes free again, the data stored in the RAM is then written to the file. It's a lot more efficient than dropping the speed and/or disconnecting from peers and then reconnecting once the HDD becomes usable again.
You can calculate an effective cache size using the typical size of files you download and your maximum download speed. Let's say that my system is set up to allocate disk space to new torrents and that I want to download a 4GB Linux ISO. For the purpose of this example we'll say that my drive can write this file at 35MB/s - that means it would take 115 seconds to complete. That's 115 seconds of the HDD thrashing and not being able to download at a decent speed (I'd usually get figures under 100KB/s when the disk was overloaded).
I know that I can download at a maximum of 6MB/s, and that I need to store this in RAM until the allocation has been written (115 seconds). So 115s * 6MB/s would give me a value of 690MB. In other words during the time it takes to write the pre-allocation, I could have downloaded 690MB, but without the buffer this wouldn't have happened.
And that concludes our uTorrent tuning. If you find any better settings, please post them below
No comments:
Post a Comment